/ nginx / docs
PHP caching / NOT REVERSE PROXY CACHING
This document is about caching content on each machine not the proxy they are connected to.
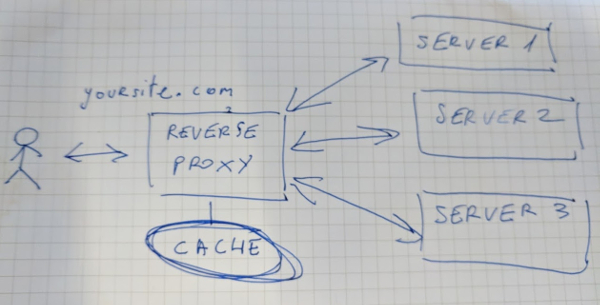
What is a reverse proxy?
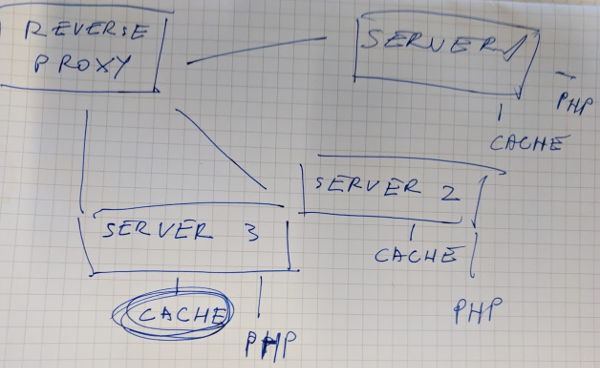
Difference between reverse proxy caching and PHP caching
Reverse proxy cache
- Prefix:
proxy_cache_.
PHP caching
- Prefix:
fastcgi_cache_.
Setup the cache
In this tutorial we will set 2 caches:
- one for not authorized users that expires after 1 hour
- and one for authorized users that expires after 5 minutes.
Define those caches in the nginx.conf
fastcgi_cache_path /tmp/cache_1h levels=1:2 keys_zone=cache_1h:100m max_size=100m inactive=1h;fastcgi_cache_path /tmp/cache_5m_auth levels=1:2 keys_zone=cache_5m_auth:100m max_size=100m inactive=5m;
Explanation
/tmp/cache_1h- where to store specifc cache files.levels=1:2- structure cache directories in 2 levels like a/b/cccccccccccc.max_size- total amount of cache directory’s size. If I understand correctly will consume same amount of memory to keep track of those files.inactive- time the cache expires.
Tell NGINX that we want to control cache by our own
By default NGINX cache reacts to Cache headers
fastcgi_ignore_headers Cache-Control Expires Set-Cookie;
Define allowed request methods that can be cached
In case if we don’t want to cache PUT (update) requests or others.
fastcgi_cache_methods GET HEAD; # Only GET and HEAD methods apply
Use the 1 hour unauth cache for a static content like text
See a working example.
- Duplicate
index.phptoindex_cached_1h.php. To understand why this is necessary read Why conditional requests are harder to implement for PHP?.
Parameters
- URL will be
/static-text; internal- do not allow to accessindex_cached_1h.phpexcept in internal requests.fastcgi_cache_key- variables from which the cache is constructed. Will be explained later in more details.fastcgi_cache- the name of the cache You want to use.fastcgi_cache_valid- “confirm that it really should expire after 1 hour”.add_header- add info about the cache.$upstream_cache_status- The status can be either “MISS”, “BYPASS”, “EXPIRED”, “STALE”, “UPDATING”, “REVALIDATED”, or “HIT”.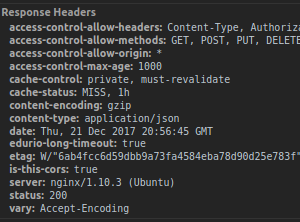
1h- a key to identify which cache was processed. Good for debugging.always- If the always parameter is specified, the header field will be added regardless of the response code. Which means if it is not added then header sometimes can not appear.include/snippets/fastcgi-php.conf;- include the regular fastcgi commands likefastcgi_pass unix:/var/run/php/php7.0-fpm.sock;.
location /static-text {
	try_files $uri /index_cached_1h.php?$args;
}
location ~ \index_cached_1h.php$ {
	internal;
	fastcgi_cache_key "$scheme$request_method$host$request_uri$http_language";
	fastcgi_cache cache_1h;
	fastcgi_cache_valid 1h;
	add_header Cache-Status "$upstream_cache_status, 1h" always;
	include snippets/fastcgi-php.conf;
}
In this example cache’s file name fastcgi_cache_key is based on:
- Protocol / scheme - $scheme. Like http, https, ftp.
- Request method - $request_method. Like GET, POST, PUT.
- Host domain / IP - $host. Like, example.com.
- URI - $request_uri.
- ‘Language’ header- $http_language. Like lv, en. This header must sent with the request manually.
So if any of these values changes then a new cache is written.
Done
- Now restart with
sudo systemctl restart nginx.service.
Test
- In the
/static-textend-point add a 5 second delay. - Open the browser.
- Open Dev tool’s network tab so we could see the page’s response.
- Go to
/static-text. - There is a 5 second delay and the response contains a new header ‘Cache-Status’ with a value “MISS, 1h”;
- Refresh.
- The response is instant and ‘Cache-Status’ header now is ‘HIT, 1h’.
Use the 5 minute auth cache for a user dependant content that can be 5 minutes old
Like FAQ that depends on the user that has been logged in. Like there could be different questions for a business and a personal account.
- Duplicate
index.phptoindex_cached_5m_auth.php. To understand why this is necessary read Why conditional requests are harder to implement for PHP?.
Parameters
- URL will be
/faq; - Here we use the same principles - define which cache to use, for how long, and add a status header.
The main differences from the example above:
The authorization is provided with one extra header cid ($http_cid) which is a unique
ID that works the same as a session id or a JWT token. This header must be sent with the request
manually just like the ‘Language’ header ($http_language).
Here’s an example how to do that:
- Set the
cidcookie after the user has been logged in. Set it to 5 minutes.
setcookie('cid', hash('sha256',mt_rand()),time()+60*60*24*7, '/', $_SERVER['HTTP_HOST'], false, false);

- Attach the cookie’s value to the requeast as
cidheader. 
- Remove this cookie in the logout method.
Hints:
- If the
cidcookie value can not be read and sent then try to set the ‘http_only’ (I guess the last param) value to false because otherwise cookie is not accessible to Javascript. - It could be necessary to add the
cidheader in the CORS file to the list of allowed headers.
This header is used at the end of the fastcgi_cache_key with the $http_cid variable where
the pattern is $http_HEADER_KEY.
location /faq {
	try_files $uri /index_cached_5m_auth.php?$args;
}
location ~ \index_cached_5m_auth.php$ {
	internal;
	fastcgi_cache_key "$scheme$request_method$host$request_uri$http_language$http_cid";
	fastcgi_cache cache_5m_auth;
	fastcgi_cache_valid 5m;
	add_header Cache-Status "$upstream_cache_status, 5m_auth" always;
	include snippets/fastcgi-php.conf;
}
Test
- In the
/faqend-point add a 5 second delay. - Open the browser.
- Open Dev tool’s network tab so we could see the page’s response.
- Go to
/faq. - There is a 5 second delay and the response contains a new header ‘Cache-Status’ with a value “MISS, 5m_auth”;
- Refresh.
- The response is instant and ‘Cache-Status’ header now is ‘HIT, 5m_auth’.
Additional note
If you don’t want the cache to be used if the authorization ID cid have not
been sent then you just need to add a condition that changes blocks according
to the $http_cid value.
Example
location /faq {
	set $index_file 'index.php';
	if ($is_auth = true) {
		set $index_file 'index_cached_5m_auth.php';
	}
	try_files $uri /$index_file?$args;
}
Resources
- http://czerasz.com/2015/03/30/nginx-caching-tutorial/
- http://docs.unified-streaming.com/tutorials/caching/reverse-proxy.html
- https://mattbrictson.com/nginx-reverse-proxy-cache
- https://www.slideshare.net/ortussolutions/itb2017-nginx-effective-high-availability-content-caching
- https://blog.alexellis.io/save-and-boost-with-nginx/
- https://devcenter.heroku.com/articles/increasing-application-performance-with-http-cache-headers
- https://www.nginx.com/blog/benefits-of-microcaching-nginx/